Merchant Product Fields
v12 and up. Pro only.
In ShopSite version 12, custom merchant product fields were added so merchants can create their own add to cart form with add options and submit those to ShopSite. The product options in the merchant's custom form do not need to be part of the product in ShopSite. Before this option will work, you will need to go to Commerce Setup > Order System > Shopping Cart and check the checkboxs to "Allow field as input on a product add" and "Display field on order screens (can be used for debugging)"
Now that you have enabled the Merchant Product Field feature, you can add input tags (or textarea, select, etc) to your own custom add to cart form with the name for those additional elements set to the product SKU or itemnum then a colon, then "merchant". Below are a few examples of what those additional form tags would look like in your custom add to cart form.
Note, the "0" in the example lines is the product SKU or product itemnum.
-
<textarea name="0:merchant"></textarea>
<input type="text" name="0:merchant">
<select name="0:merchant"><option value="Small">Small</option></select>
Below is an example of a Merchant Product Field in a custom add to cart form used in a custom template.
-
<form action="[-- SHOPPING_CART_URL Base --]/order.cgi" method="post">
<input name="storeid" value="[-- STORE.ID --]" type="hidden">
<input name="dbname" value="products" type="hidden">
<input name="itemnum" value="[-- PRODUCT.RecordNumber --]" type="hidden">
<input name="function" value="add" type="hidden">
<textarea name="[-- PRODUCT.RecordNumber --]:merchant"></textarea>
<input name="submit" value="Add To Cart" type="submit">
</form>
(v11 and earlier) Divided Customer Text Entry Fields
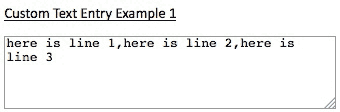
There are two options available for this and they both have their pros and cons. The first option is to use the customer text entry field available in all three levels of ShopSite under Products > Edit Product Info. Once the customer text entry field is enabled for a product, you will modify your custom template so that by enabling that one field, three fields are displayed on your store pages. All three of these fields will pass their contents to the one field listed in the cart. Below is an example of using this option, and what it will look like in the cart.
|
Custom Text Entry Example 1 (for version 11 and earlier) |
 |
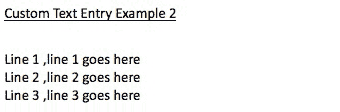
The second option is to use make-shift ordering options and have those make-shift ordering options stay in the cart by making it so that customers cannot change them once they are added to the cart. This option is only available in ShopSite Pro but it gives you more control over the look of the options in the cart. Below is an example of this method with an image showing what it looks like in the cart.
|
Custom Text Entry Example 2 (for version 11 and earlier) |
 |
Custom Text Entry Example 1 (for version 11 and earlier):
- In your custom template, replace the add to cart form with the form below.
- Assign your custom template to your product, and turn on your product's custom text entry field (Products > Edit Product Info).
-
<form action="[-- SHOPPING_CART_URL BASE --]/order.cgi" method="post">
<input type="hidden" name="storeid" value="[-- STORE.ID --]">
<input type="hidden" name="dbname" value="products">
<input type="hidden" name="function" value="add">
<input type="hidden" name="itemnum" value="[-- PRODUCT.RecordNumber --]">
Line 1 <input name="[-- PRODUCT.RecordNumber --]:freeopt" type="text"
id="[-- PRODUCT.RecordNumber --]:freeopt" value="here is line 1" size="15"><br>
Line 2 <input name="[-- PRODUCT.RecordNumber --]:freeopt" type="text"
id="[-- PRODUCT.RecordNumber --]:freeopt" value="here is line 2" size="15"><br>
Line 3 <input name="[-- PRODUCT.RecordNumber --]:freeopt" type="text"
id="[-- PRODUCT.RecordNumber --]:freeopt" value="here is line 3" size="15"><br>
<center><input value="Add To Cart" type="submit"></center>
</form>
Custom Text Entry Example 2 (for version 11 and earlier):
- ShopSite Pro stores only
- In your custom template, replace the add to cart form with the form below.
- Add a space in the "order option description" field under Products > Edit Product Info.
- Your product can not have ordering option pull down menus.
- Check the checkbox to not allow customers to change ordering options in the cart (Commerce Setup > Order System > Shopping Cart).
-
<form action="[-- SHOPPING_CART_URL BASE --]/order.cgi" method="post">
<input type="hidden" name="storeid" value="[-- STORE.ID --]">
<input type="hidden" name="dbname" value="products">
<input type="hidden" name="function" value="add">
<input type="hidden" name="itemnum" value="[-- PRODUCT.RecordNumber --]">
<input type="hidden" name="[-- PRODUCT.RecordNumber --]:finoptnum" value="3">
<input name="[-- PRODUCT.RecordNumber --]:finopt:0" type="hidden"
id="[-- PRODUCT.RecordNumber --]:finopt:0" value="Line 1 ">
Line 1 <input name="[-- PRODUCT.RecordNumber --]:finopt:0" type="text"
id="[-- PRODUCT.RecordNumber --]:finopt:0" value="line 1 goes here" size="15"><br>
<input name="[-- PRODUCT.RecordNumber --]:finopt:1" type="hidden"
id="[-- PRODUCT.RecordNumber --]:finopt:1" value="Line 2 ">
Line 2 <input name="[-- PRODUCT.RecordNumber --]:finopt:1" type="text"
id="[-- PRODUCT.RecordNumber --]:finopt:1" value="line 2 goes here" size="15"><br>
<input name="[-- PRODUCT.RecordNumber --]:finopt:2" type="hidden"
id="[-- PRODUCT.RecordNumber --]:finopt:2" value="Line 3 ">
Line 3 <input name="[-- PRODUCT.RecordNumber --]:finopt:2" type="text"
id="[-- PRODUCT.RecordNumber --]:finopt:2" value="line 3 goes here" size="15"><br>
<center><input value="Add To Cart" type="submit"></center>
</form>

Facebook Connect for Registration